Tuesday, February 21, 2017

Warm Wishes

Hello fellow crafters, happy Tuesday.  It's still winter here in New England so I thought this adorable Julie Nutting doll from Prima Prima Julie Nutting Doll Cling Stamp Warm Wishes 501 would help make us feel warmer.


I combined the doll with a snowflake doily die cut I also purchased from 7 Kids.  I added the small snowflake die over top two inside portions from this same die, stamped one of the sentiments from the stamp set and added two folded velum envelopes on each bottom corner.


I enjoy making mixed media projects, some more simple like this one, some I just start by tearing strips of paper, placing them randomly and then adding textures, stencil patterns, stamps, chipboard and embellishments.
 
Happy crafting.  Please check out 7 Kids online store for these and many other crafting supplies.  Sandy 
 

Wednesday, February 8, 2017

7 Kids February Challenge

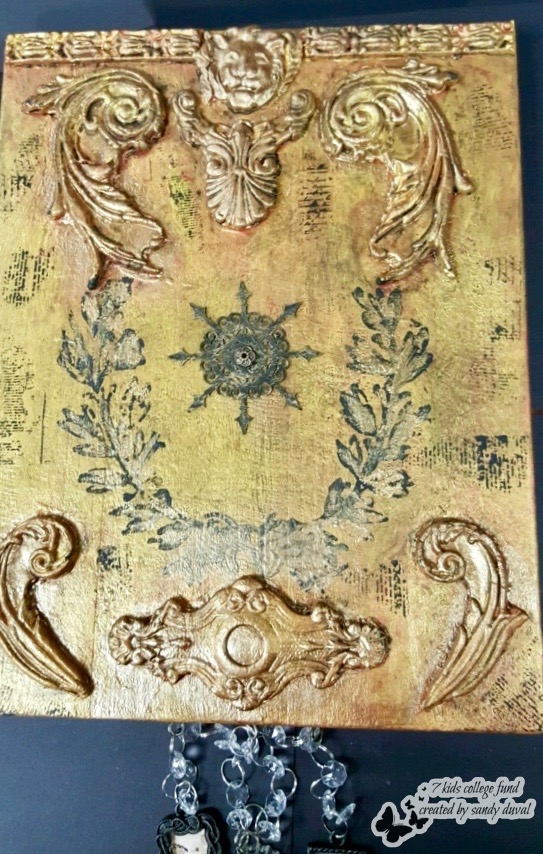
Hello, welcome to 7 Kds February Challenge.   I attended the Prima Art Venture in Phoenix in January and one of the projects we did was with Iron Orchard Designs using their paper clay Pre Order Prima Paper Clay and their molds Pre Order IOD Vintage Art Decor Mould Baroque 6, Pre Order IOD Vintage Art Decor Moulds - "Escucheons 2".  What a great, inexpensive way to add design, dimension and architectural elements to your projects. 
 
The background is on Prima's Vintage Wall Deco Base painted with black, red, and copper paints Prima Art Alchemy Metallique Royal Red Paint, Prima Art Alchemy Metallique Steampunk Copper Paint. 
 
We used a script stamp and wreath stamp with black ink for additional interest.  I added a Wycinanka chipboard piece in the middle Wycinanka Let It Snow 14 and a tiny Prima metal flower in the middle.
 
Hung some of Prima's trinkets off the bottom with eye screws.


Look for these and many more awesome crafting items with 7 Kids.  Have fun crafting.  Sandy

Tuesday, February 7, 2017

Love and Flowers

Hello, happy Tuesday everyone.

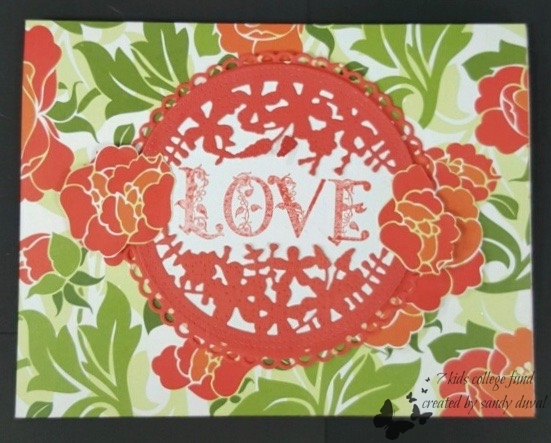
With Valentine's Day coming up, many of us have our loved ones on our minds.  I combned the Key to Love stamp set from Clearly Whimsy Stamps Whimsy Stamps New Key to Love with the Tonic Studios Have A Beautiful Day Circle Frame die set.  Tonic Studios Sew Pretty - Have a Beautiful Day Circle Frame for the special day.  As flowers are also so much of Valentine's Day.  I used a floral paper for the background, fussy cutting a few of the flowers to place on the edges for some added dimenson.


Shop 7 Kids for these items and many other wonderful crafting selections.
Hope all of your enjoy your Valentine's Day!
Sandy

Tuesday, January 24, 2017

Wycinaka Steampunk

Hello fellow crafters and especially steampunk lovers. 
 
I was so excited when I saw 7 Kids was carrying steampunk chipboard pieces from Wycinaka; I just had to have them all!  I have a number of sizes of cigar boxes and thought one of them would be perfect for a steampunk project.  I have a lot of papers with a steampunk theme and picked one to show off the chipboard.  I thought putting the corners opposite each other would add more interest; colored them with chalk spray from my stash.


Here is the inside of the box showing the chipboard on each side and one in the top left corner.  I added just a few mental embellishments and wood balloon as it just isn't steampunk without some metal.


This is the inside of the lid; I loved this chipboard piece and didn't want to add to much to distract from it. 


On the outside edges of the box, I used the same pieces as on the sides of the inside but used a chalk spray close to the color of the paper. 


This shows front edge of box.


Visit 7 Kids College Fund and see all the wonderful chipboard from Wycinanka and all the other wonderful items you can get for your crafting.  Have fun crafting.  Sandy

Wednesday, January 11, 2017

Whimsy Bears Love February Challenge

Hello crafters and welcome to the February Challenge with 7 Kids.
 
These bears from DoCrafts Forever Friends Forever Love'Big Heart' were a perfect choice to say Valentine's Day is just around the corner.  Used copic greys to outline the bears and their wings as I wanted the heart to be the focal point.  Then paper pieced bazzill for the heart and placed a 3D embellishment on top.


Used some valentine paper in my stash to cut the X Cut Rose Dollie die, placed a prima flower in the middle and stamped the accompanying sentiment onto heart dies for the corners.  The background paper and embellishments were also some from my stash.


Thanks for stopping by the 7 Kids College Fund challenge.  Please be sure to check out them out as there are always new items being added in the store.  Happy crafting, Sandy


Tuesday, January 10, 2017

Nature Sketchbook Napkin Fold Card

Hello everyone, happy Tuesday! 
 
I love Graphic 45 papers and since I just received the Nature Sketchbook collection, wanted to do a project showcasing the paper.   I thought this napkin fold card would show off one of the papers.  The base is a sheet of 12x12 bazzill paper covered with the Wildflower Bouquet from the collection.  Used a chipboard piece to complete the belly band closure.


When the belly band is removed, the card unfolds into this beautiful, colorful card.  The middle portion and the belly band are the back of the Wildflower Bouquet paper with one of the stickers and a dragon fly cut from the matching 6x6 papers.  The words are also from the sticker sheet; used 6x6 sheets for die cuts.
 

Thanks for stopping by.  Be sure and stop by 7 Kids College Fund store to see this paper and many more beautiful items.  Keep crafting.  Sandy

Wednesday, December 14, 2016

Gorjuss Girl and Friend


Merry Christmas fellow crafters.  Welcome to Dec 7 Kids Blog Challenge.
I have used a Gorjuss Girl stamp, colored her and her little fried with copic markers, placed her on top of a piece of plastic colored with alcohol inks.  I cut a wreath from Graphic 45 St. Nicholas paper Graphic 45 St Nicholas 12 x 12 Paperon my cricut, added red hearts instead of berries to match the hearts on her dress and some brads from my stash.  I placed the wreath on top of  Wycinanka chipboard, Wycinanka Elegance Bohemian Circle Frame, then put red lace on the back.


Tuesday, December 13, 2016

Pion Star Book

Happy holidays! 
I made a star book using the Pion Design The Night Before Christmas 6x6 papers  Pion Design The Night Before Christmas 6x6 Papers.  Solid papers were bazzill, ribbon from my stash, all chipboard from Wycinanka.


Here is the front of the star book. 


These are pages 1 and 2.  Used the embellishment cutout sheets that came with the paper to decorate the pages.


For page 3, I used a Wycinanka chipboard piece Wycinanka Very Merry Baubles and Bough, colored with glitters and added a Pion embellishment cutout as the ornament.


On page 5, I added a Wycinanka chipboard candle Wycinanka Christmas Nostalgy-Candles, colored with glitter to oordinate with the candles on the tree.


Page eight has a Wycinanka chipboard-In The Mountains Pointy Lace Doily Wycinanka In The Mountains Pointy Lace Doily Chipboard, again colored with glitter.


The next four pages feature more Pion embellishment cutouts.


And this is the back of the book, with more cutouts.


This paper worked so well for the sized pages in this book.  Stop by 7 Kids store to find these items and many more for your projects.  Sandy

Monday, December 12, 2016

Christmas Ornaments

Hello everyone, welcome to 7 Kids Challenge Blog for November.


Had a number of glass ornaments hanging around and after seeing a video on a new way of using stamps, decided to give it a try.  Used the ME City Sidewalks stamp set for the houses, snowman, snowflakes and saying.  Santa in sleigh going across moon is from St. Nicholas stamps with Graphic 45.  Stamped on white tissue paper, cut out images and used Glue n' seal to glue on ornament and also on top to seal.  Colored with copics, used sparkle pen over snowman and snowflakes, highlighted saying with Wink of Stella gold.  Put some glitter on inside, sprayed glue on inside and shook the glitter around so would stick all over inside.


This was a square ornament so used the Graphic 45 St. Nicholas stamps to do all 4 sides.  Colored the hollies with copics.


More of the St. Nicholas stamps, added the snowman from ME City Sidewalks.  Went over snowman, snowflakes and saying with sparkle pen.  The holly around neck is gold stickers, filled in with copics.


And here is St. Nicholas with his sack of toys.  Copics used to color along with sparkle pen on fur, hair and beard.


And here's the fourth side.  Used copics on holly and the sparkle pne on saying, highlighted the decoration above and below the saying with the Wink of Stella gold.  Added glitter to inside, sprayed glue in and shook glitter around, again to get coverage inside.

Can't wait to see what all of you post for the challenge.  Stop by 7 Kids site and get your goodies in time for your Christmas cards and gifts.  Sandy


Tuesday, November 29, 2016

Mama Elephant Christmas Ornament

Hope everyone had a wonderful, safe and happy Thanksgiving. 

Used the City Sidewalks stamp set Mama Elephant City Sidewalks Clear Stamp to create a shaker ornament.  Used copic markers, gold wink of stella on windows, a little white opal liquid pearls for snow, then shook clear glitter on top.  Background was done with faded jeans distress ink, stamped tress on top using forest moss distress ink, then added stars and pearls from my stash. 


I put a piece of acetate along with a layer of five circles over the background, then used dimensional tape to pop up building on top of this layer; glued ribbon for hanging.  Then added 10 layers of circles, glitter, acetate and another layer of circles.  To finish, used some foil paper to cut out circle and glue on top. 


Then I hung it from the tree!

Tuesday, November 15, 2016

Expandable ATC File/Tree Ornament


Wow, where is November going-happy Tuesday to everyone. 


File open showing ATC's peeking out of pockets.  I just love the versatility of Graphic 45 papers.


This shows the file box closed with attached ribbon so can be hung from the tree.


File open with ATC pockets and ATC's partially out.


Here are the ATC cards out of the pockets.  Paper used for this project was Graphic 45 St. Nicholas papers, 6x6, 8x8, 12x12, banner embellishments; solids are bazzill paper, die cuts from Spellbinders (with exception of tree) with embellishments from my stash.

Please stop by 7 Kids College Fund store and see all the wonderful items you can purchase for all your crafting projects and gifting.  Sandy

Tuesday, November 1, 2016

St. Nicholas Welcomes November

Hello and happy Tuesday!


I used the wonderful St. Nicholas papers and matching chipboard from Graphic 45 to make this explosion box.  Don't know about all of you but once November begins, Christmas comes all too soon.  Solid papers are bazzill; white paper from DCWV-glitter papers. 


Thanks to so many wonderful people who share so many of their projects on you tube, I added this second box in the middle. The box also flips over to one side so a note or picture can be added; magnets added so box doesn't flip unless you want it to.


This beautiful corner snowflake die is from Precious Marieke-received it just in time from 7 Kids to use in this project.  This third layer holds a tag that is backed with plain black paper for more pictures or journaling.  The little tabs peeking out are on the outside of the middle layer so the top page can be lifted up to reveal the inner pages.  Tags were cut from an Elizabeth Crafts die; tiny tabs from Spellbinders die.

 The to/from label is one of the matching stamps to this paper from Graphic 45.  The little pull on top is from Tim Holtz.


 This view shows the middle layer with the top flap turned over so the holly belly band and tag can be seen along with the back of the top page.  Holly die from Spellbinders.


The lid is partially off the middle box to show snow flake border and a place for a small surprise/present.  Snowflake border was from one of my many punches (Fiskers).


Oh, but there's already a surprise in the box-one of the delicate chipboards from Wycinancka-I hung it from a piece of thread tied to the pull.

7 Kids College Fund supplies list:


Thanks so much for stopping by today!  Please check out 7 Kids store for these and many more items.

Tuesday, October 18, 2016

Totally Halloween.

Hello and happy Tuesday!


This tag was made utilizing Ranger TH products-Mini Halloween cling stamps and crayons can be purchased from 7 kids shop.  I call it Totally Halloween.   The skeleton head was from TH Halloween Paper Stash, put a TH monocle over it and attached to the ribbon with a TH safety pin.  Ribbon colored using distress stains in twisted citron and wilted violet.

Did the stamping first with Ranger Jet Black Archival; went over tag with crazing.  Once crazing dried, used TH distressed crayons in carved pumpkin, black soot, twisted citron and wilted violet to add colors.  Cut the 31 from TH paper and put a fragment over top.


Had a lot of fun making this tag and utilizing so many stamps from one set.

Goodies used:


Happy Halloween,


Sandy

Wednesday, October 12, 2016

7 Kids College Fund Challenge.

Hello


This is my first blog challenge post for 7 kids college fund.  I am so excited that I was invited to be on the design team.

Mini Halloween Shadow Box

This little wooden box is from Prima-it held their wooden gears; I went over it with Tim Holtz black soot stain; all the papers are from Authentique Mysterious paper.


I've had these glitter bottles for some time-one of those must have purchases-took the labels off and replaced labels using the Mysterious paper. 


The metal trinkets and skull are from Tim Holtz.


The little Trick or Treat sign was made by my sister.


I covered one of the advertisements from the Mysterious paper with plastic I colored with alcohol inks.


Wednesday, October 5, 2016

Sandy sharing her very first DT project!

Happy Tuesday everyone!  I'm finally joining the blog land!
Sandy here, I'm super excited to be a part of the 7 Kids College Fund team and today I'm sharing a wicked Halloween tag with you today.


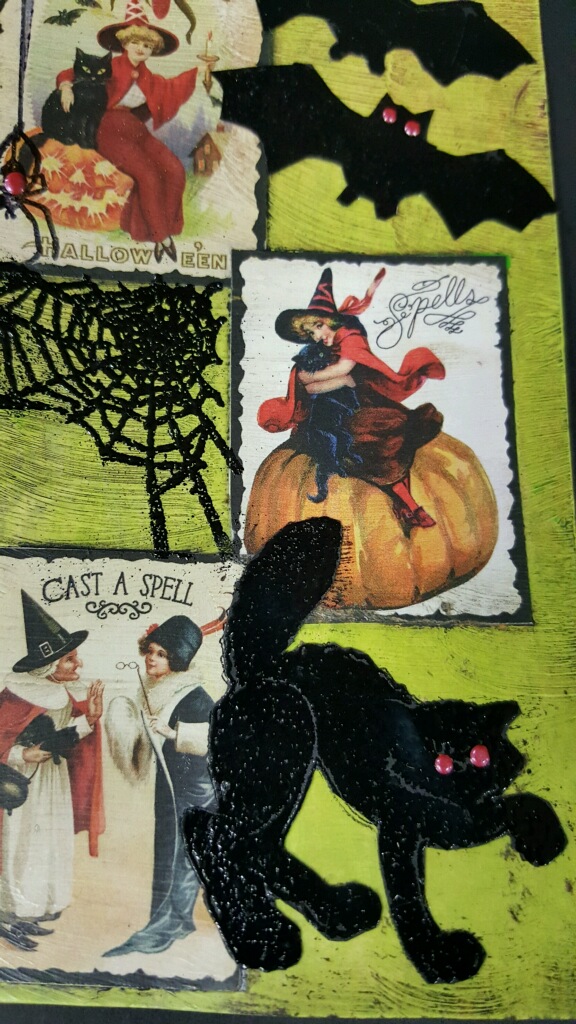
I started by creating the background using Tim Holtz Twisted Citron distress paint and matte collage medium over the paint.  Then I touched lightly with Tim Holtz distress ink pads in Carved Pumpkin, Wilted Violet, and Gathered Twig.  The halloween images are from the Authenique Mysterious Halloween paper. 


I also added an embossed cat, bats, and web with Ranger black archival ink and black embossing powder.  For the 'red eyes' on the bats, I used Nuvo gloss crystal drops in Autumn Red


Thanks so much for joining me today and have a 'wicked' awesome day!